
Edit: I’ve changed definitions of some of the rows, and added photos that I think are more clear.
I just came to the end of a week-long adventure working out a stripe on my current afghan project. It’s a happy ending — I now have a version of box stitch that’s
- Truly reversible
- A bit easier to work
- A bit lighter and slightly less of a yarn hog.
I have a whole story to tell, but if you want, you can jump to the instructions.
The story began when I decided to include Box Stitch in the striped afghan I’m currently working on. It’s a really great-looking stitch, and I had in mind the perfect place to use it. I’d never tried that stitch before, so I headed to a detailed photo tutorial. That may have been my first mistake. But it certainly wasn’t my last. Here’s what happened:
Day 1
- I read the tutorial,
- Figured out how to start on a bed of established stitches (rather than a chain),
- And laid down the first (2-row) stripe.

Day 2
- I brought up the tutorial, made the next (4-row) stripe,
- Noticed that the wrong side didn’t look great,
- Decided it wasn’t bad enough to pull out four rows and figure out how to make it better,
- Worked the next (4-row) stripe,
- Looked at the wrong side again and decided I’m not frogging 4+ hours of work, and…
- Weaved in all the ends. (Foreshadowing? Maybe.)

Day 3
- I studied the tutorial and “realized” I’d been doing it wrong,
- Undid the two full stripes, carefully preserving all the yarn,
- Made a stripe the “correct” way
(Hmmm… what’s with all the scare quotes, Rachel?), - And put it away because my head needed a break.

Day 4
- I decided the tutorial I was using was too hard to follow,
- Made another stripe. carefully following along with a very clear video…
- Checked the wrong side and saw that it was different from the correction I made the day before,
- Removed the two reworked stripes,
- Attempted to do it the “wrong” way (from Day 3)
because I thought the wrong side was better when I did it “wrong”… - Decided the wrong side still didn’t look good enough.
- And put it away for mental health reasons.

Day 5

- I frogged the Day 4 rows,
- Worked out a modification I was happy with (it only took three tries)
- Made one stripe the new way…
- And put it away because my head needed a break. (Are we sensing a theme here?)
Day 6
- I finished the next 2 stripes (Woot!),
- Figured out how to even out the top.
(Nope, I didn’t get it on the first try.
Who would have guessed?), - Made the first of 2 rows for the filling-in part…
- And put it away
because my head was done for the day.

Day 7
- Finished it!
- Did a happy dance.
After all that, I figured the least I could do was share. After all, making one section of a sampler afghan was not enough to justify all that work.
So finally, the moment you’ve all been waiting for, here it is…
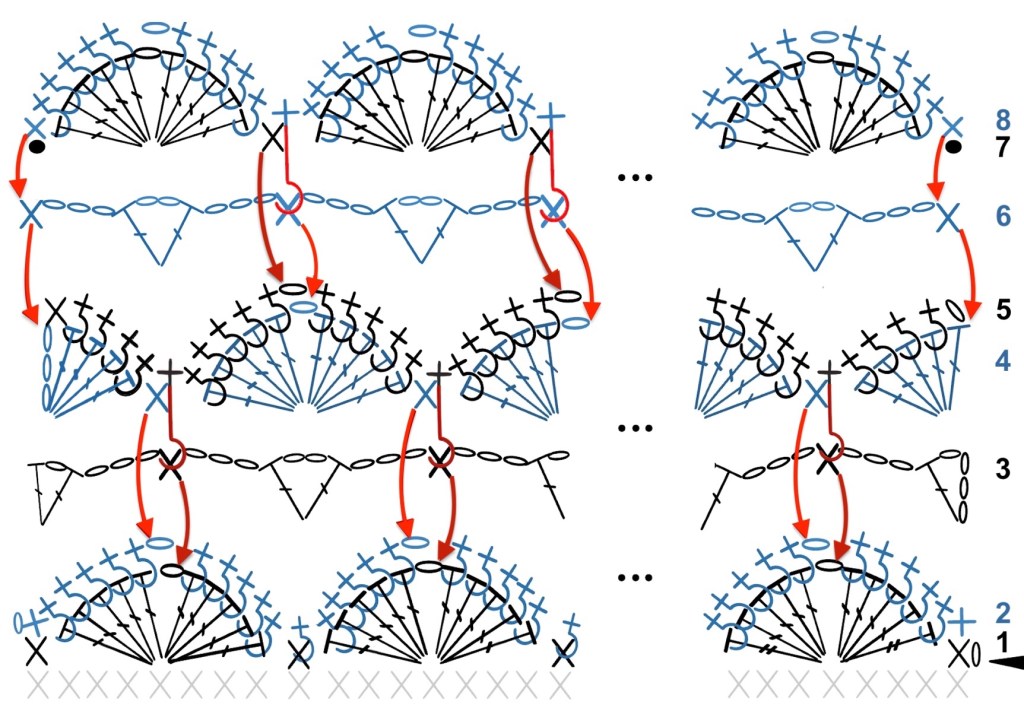
The Instructions!
The part between *’s in the row summaries represents the repeating group. Basic crochet abbreviations and chart symbols are available from a link on the sidebar.
Next up… (guess what?)
Special stitches:
- Fan stitch (Fan): [5 dcs, ch1, 5 dcs] in the same chsp.
- V stitch (V st): Work [dc ch2, dc] into the same st.
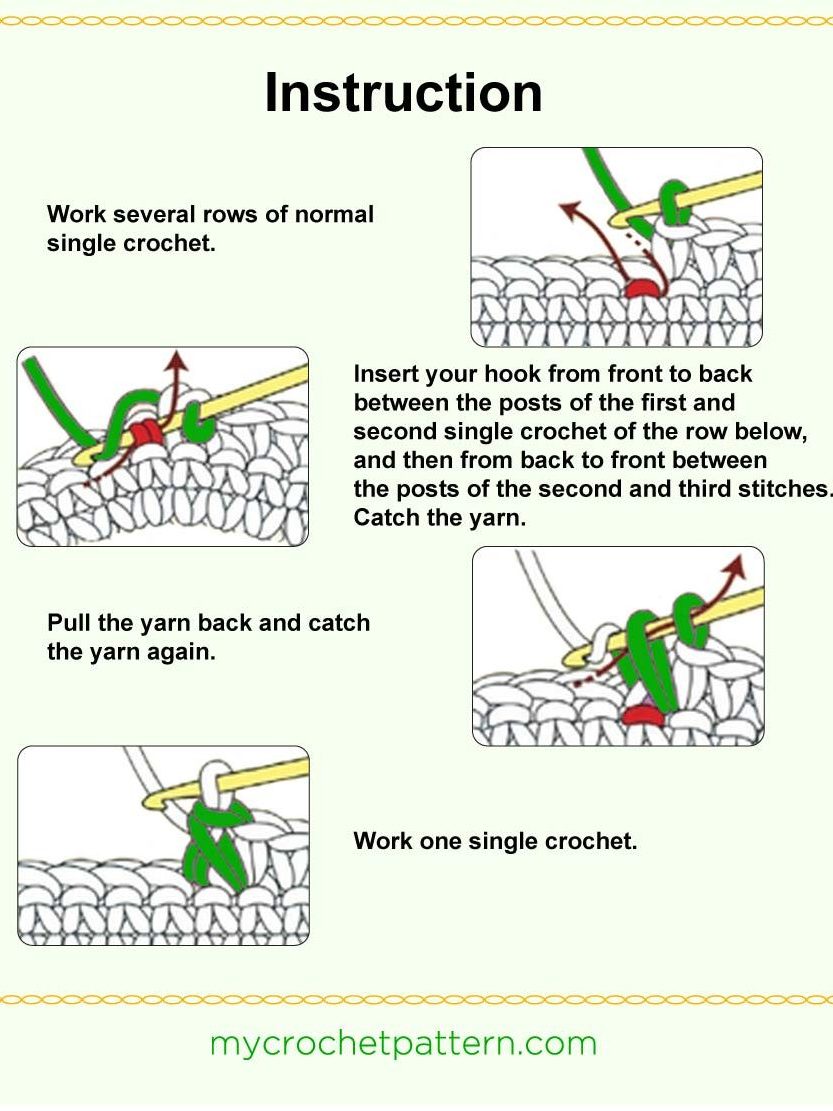
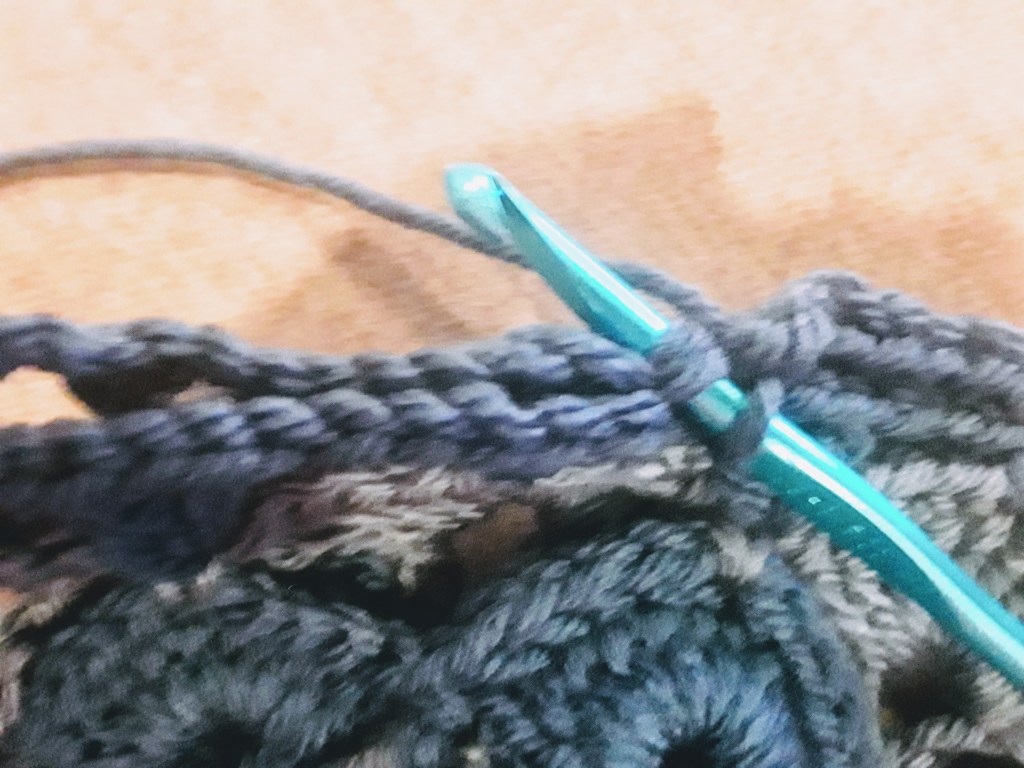
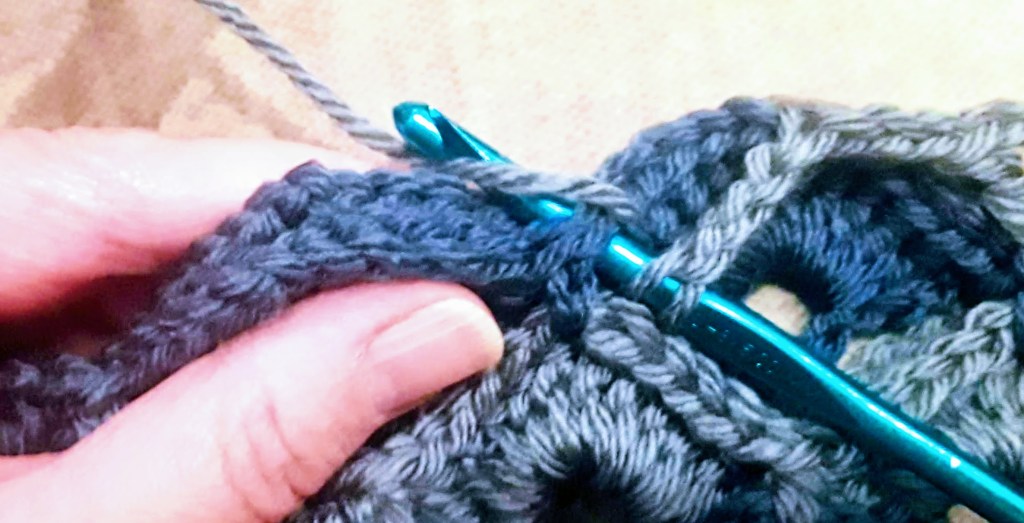
- Front post single crochet (video) (FPsc):
Insert hook from front to back; working around the post of a stitch on the previous row, make a single crochet.
Repeats and counting
Now we’re getting serious. This is designed to work on a bed of existing sc-width stitches or a chainless foundation.
Check the sidebar link for stitch symbol definitions.
But before you hurry off to work the first pattern row…
Place stitch markers. Really. Do this. It’s very easy to miscount in the first row.
- Place a stitch marker on the 18th stitch.
- Then place another marker every 24 stitches (3 pattern repetitions).
For this tutorial we’ll assume 2 colors (A and B), but you can use any number of colors you want. The color changes should always take place at the beginning of a “V” row.
Foundation row
Let’s say we start with a multiple of 8 + 1 scs.
Row 1
| 📔 If you are close to a stitch marker at end of a repeat, the sc you just made should be in the last stitch before that marker. |

(Fan Row) Begin with color A, ch1, sc in first st,
*sk next 3 sts, Fan in next st,
sk next 3 sts, sc in next st* to end.
(beg sc, *sk 3, fan, sk 3, sc*)
Row 2
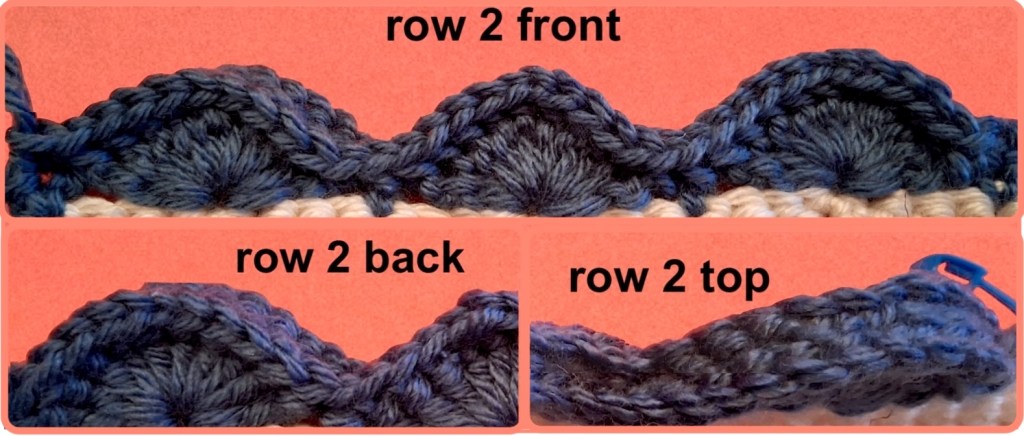
(FPsc Row) ch1, turn, sc in first st,
*FPsc around post of each of next 5 sts (up the side of the Fan), ch1,
FPsc around post of each of next 5 sts (down the side of the the Fan)☨,
FPsc around next sc*, rep between *’s to next-to-last fan,
rep from * to ☨ (once), sc in last sc.
(beg sc, *5 FPscs, ch1, 6 FPscs*, end 5 [FPscs,ch1,5 FPscs,sc])
Row 3


(V row) Join color B, ch4 (counts as dc + ch1), dc in first sc, *ch3, sk next 5 sts,
sc in ch1 sp 2 rows below (at top of Fan), ch3, sk next 5 sts,
V st in next FPsc of current row (between Fans)*,
rep between *’s to sc at bottom of last Fan,
ch3, sc in ch1 sp 2 rows below, ch3, [dc, ch1, dc] in last sc.
(beg [ch4,dc], *ch3, sc, ch3, V st*, end [ch3,sc,ch3, ½-V)
Row 4
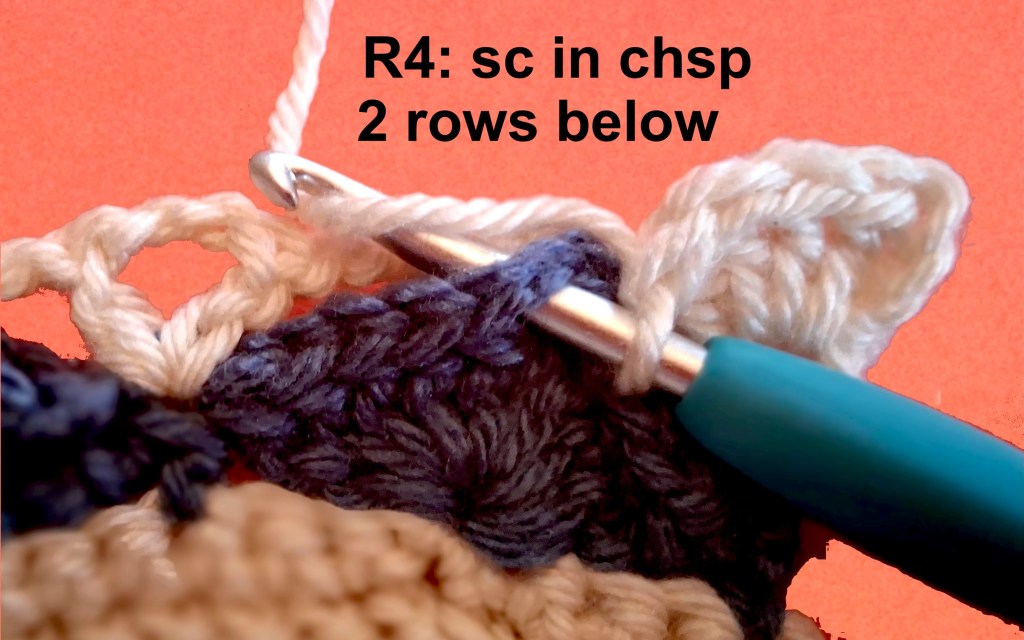
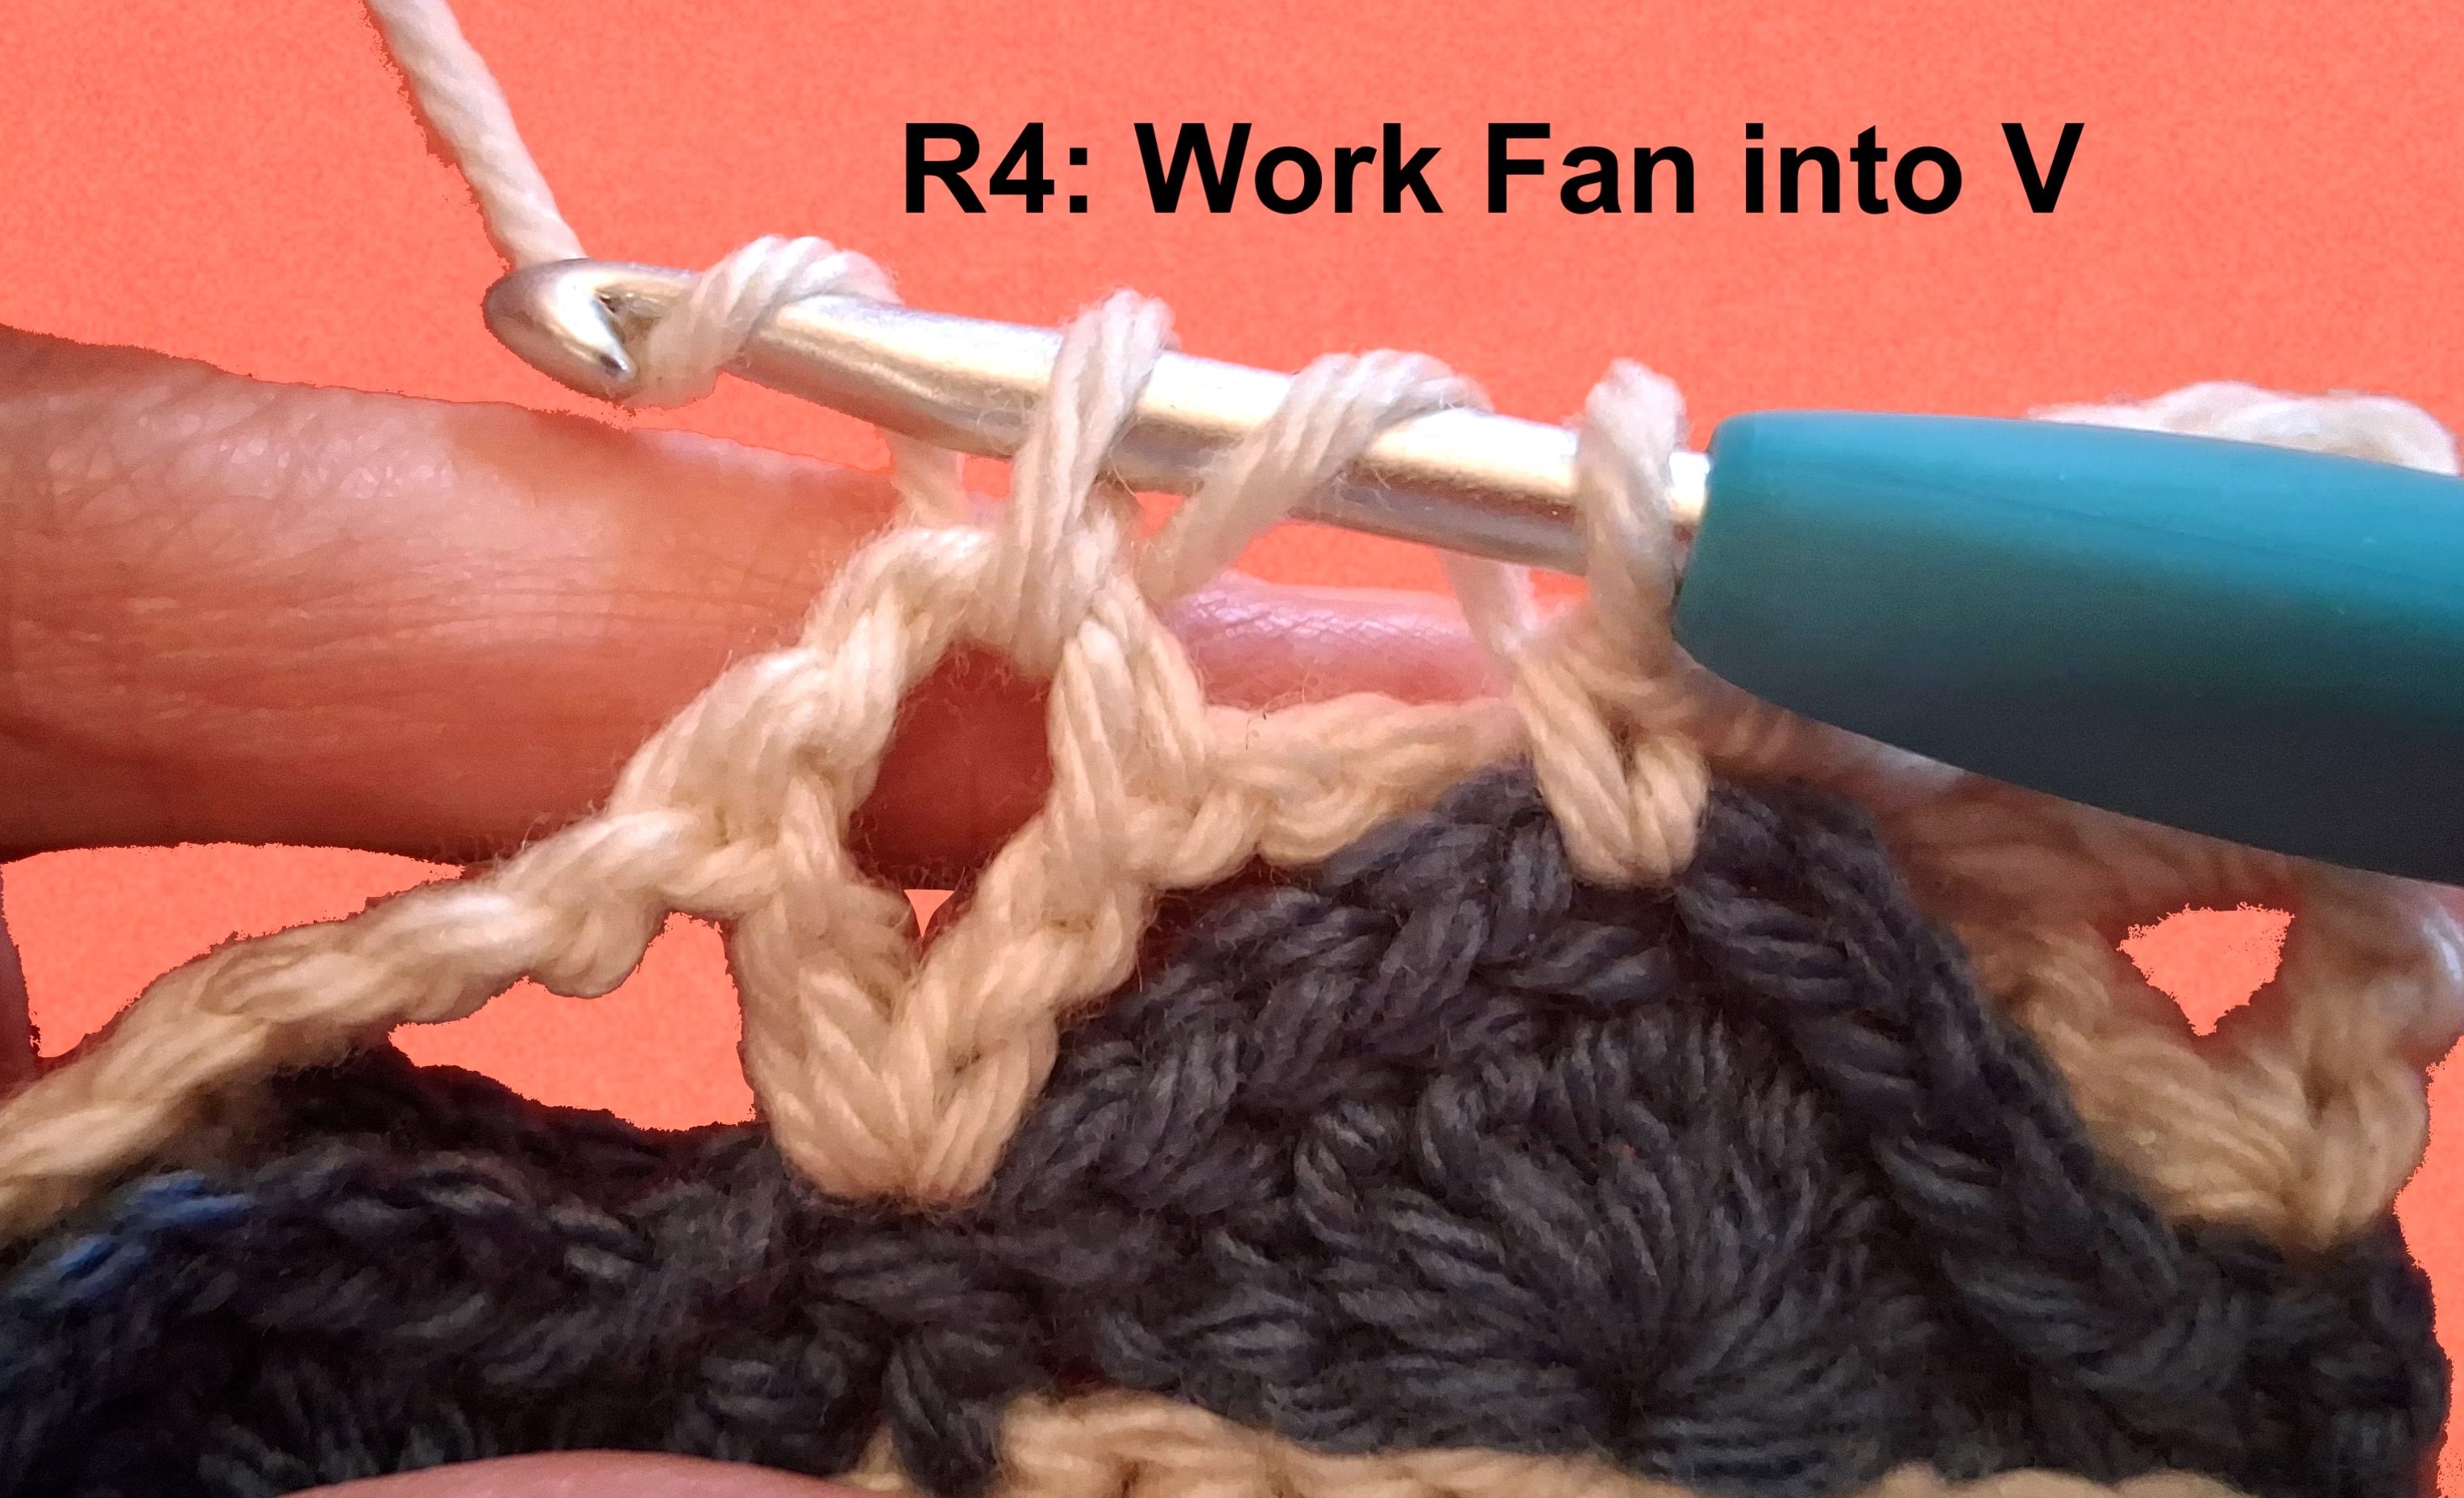
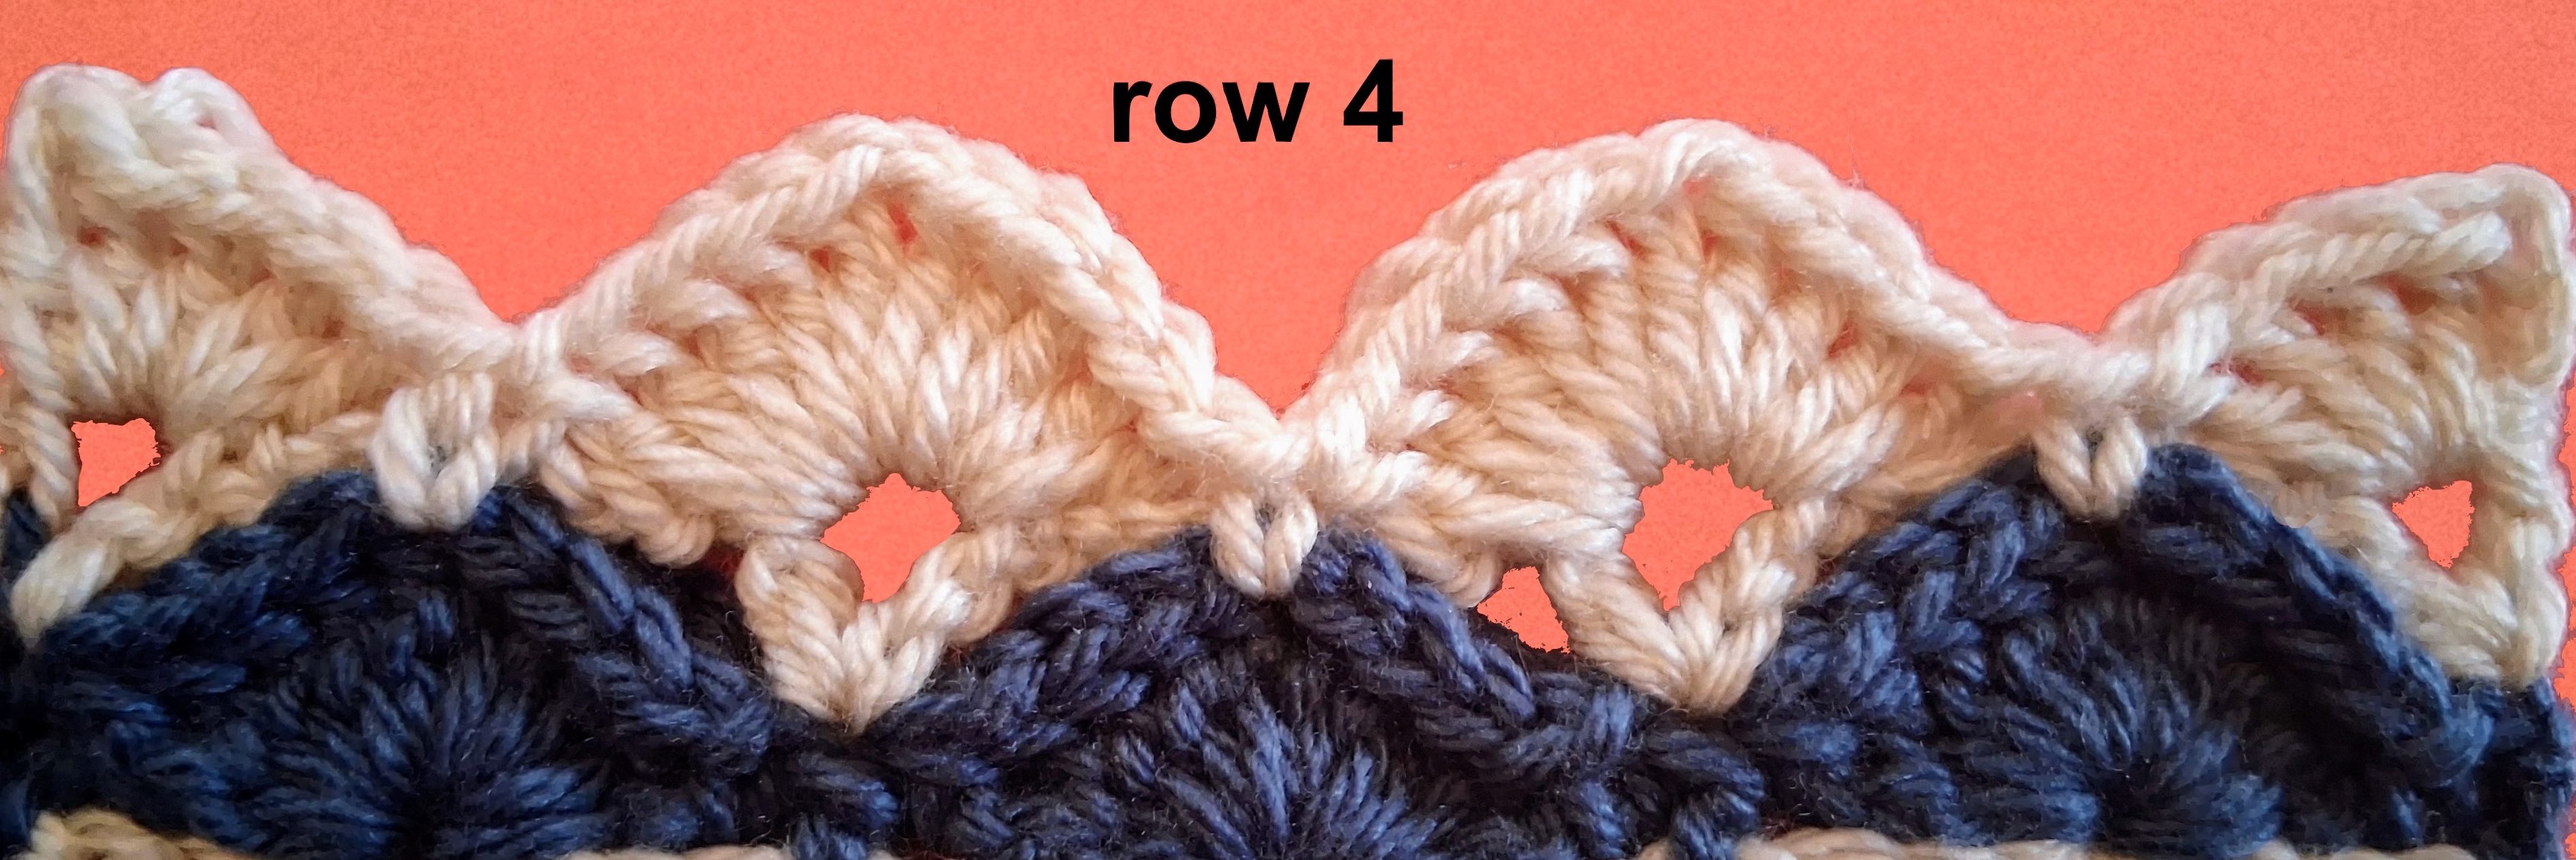
(Fan row) ch4, turn, work 4 dcs in first chsp, *sc in next ch1 sp 2 rows below,
Fan in ch2 sp the next V*, rep between *’s to last Fan, sc in next ch1 sp 2 rows below, work 5 dcs in last chsp.
(beg [ch3,4dcs], *sc, Fan*, end [sc,5 dcs])
Row 5
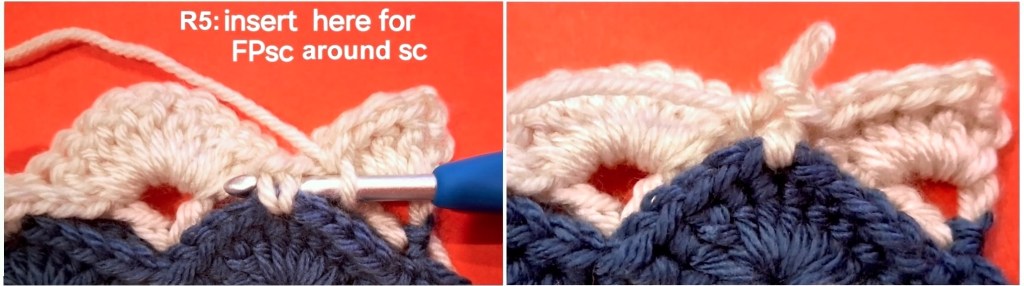
(FPsc Row) ch1, turn, sk first dc,
FPsc around posts of each of next 4 dcs (down the ½ – Fan),
*FPsc around legs of next sc 2 rows below,
FPsc around post of each of next 5 dcs (up the Fan), ch1,
FPsc around posts of each of next 5 scs (down the Fan)*,
rep between *’s to top of last Fan,
FPsc around posts of next sc 2 rows below
FPsc in each of next 4 dcs, sc in top of ch.
(beg 4 FPscs, *6 FPscs, ch1, 5 FPscs*, end [5 FPscs,1 sc)
Rows 6 – 8
| 📔 These rows are the same as the last 3 rows, just offset by half a Fan or V |
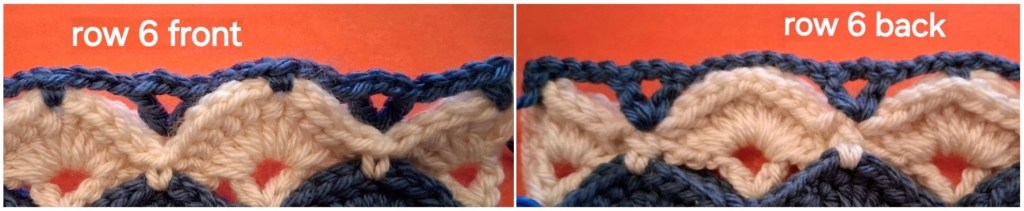
R6: (V Row) Join color A, ch1, turn,
sc in top of turning chain 2 rows below (same ch as last sc of previous row),
*ch3, make a V st in next FPsc (current row), ch3,
sc in next ch1 sp 2 rows below (at top of Fan)*,
rep between *’s to top of last Fan more times,
ch3, sc in last dc 2 rows below.
(beg sc, *ch3, V st, ch3, sc*, end ch3 + sc)
R7: (Fan row) sk next ch3 sp,
*Fan in next ch2 sp (middle of V st),
sk next ch3 sp, sc in ch1 sp 2 rows below*,
rep between *’s to last Fan, slst in last sc.
(sk beg ch, *Fan, sc*, end [Fan, slst])
R8: (FPsc Row) ch1, turn, sc in first sc 2 rows below,
FPsc around post of each of next 5 dcs (up the side of the Fan),
ch1, FPsc around post of each of next 5 dcs (down the side of the the Fan),
FPsc around next sc 2 rows below,
rep between *’s to end of last Fan,
sc in last sc 2 rows below.
(beg sc, *[5 FPscs, ch1, 5 FPscs] into Fans, 1 FPsc between each Fan*, end sc)
Filling in the Curves
Definitions:
Zipper Stitch (Zip):
Insert hook through back loop of st 2 rows below (the row nearest you)
and the front loop of the st in same position one row below,
working through those 2 inside loops,
make a sc.
ch pair: 2 matching chain stitches, one from each of the previous two rows (see image next to zipper stitch definition.)
sc pair: 2 matching scs, one from each of the previous 2 rows.
And finally… the 3 filling-in rows
I’ll write the next steps as if 1 of this section is the same as row 6 of the main pattern, but of course it could be shifted if you end on a different stripe.
R1: Change colors, ch1, turn, sc in first st,
*ch2, (sk the dcs), make a V st in next sc 2 rows below, ch2, sc in next ch1 sp (between dcs at top of Fan)*,
rep between *’s to end, ch2, sc in last st.
(beg sc, *ch2, V st, ch2, sc*, end ch2 + sc)
R2: Make one more V row on the other side as follows:
ch1, turn, sc in first sc, *ch2, make a V st in next FPsc 2 rows below (the side facing you), ch2, sc in next ch1 sp (still the side facing you)*, rep between *’s across, ch3, V st in next FPsc 2 rows below, ch3, sc in last sc.
(beg sc, *ch3, V st, ch3, sc*, end ch3 + sc)
R3: ch1, turn, sc in first sc,
work a Zip st in each chain pair across (skipping sc pairs), sc in last sc.
So that’s the whole story… well, it’s a chapter. Here’s where I am (so far) on the whole story.

A few closing thoughts.
This modified stitch is perfect for my afghan. It’s not quite as dramatic as regular box stitch, but being reversible and quicker to work up are things that matter for an afghan. Next year, I think I’ll made throw pillows for each of my daughters, in colors from each of their samplers. Regular box stitch will be great for pillows. No one’s gonna see the wrong side on a pillow (unless you have X-ray vision?) and they’re smaller, so taking more time will be fine.
I hope you found something either useful or funny in this post. And if you made it all the way here to this paragraph, Thank You!
P.S. If you give this stitch a try, I’d absolutely love to hear about it. If you find any mistakes in these instructions, or have questions, please let me know!


Leave a comment